Rendering Overview
This document is an overview of the steps to render a webpage, and how HTML gets transformed and broken down, step by step, into commands that can execute on the GPU.
If you’re coming into the graphics team with not a lot of background in browsers, start here :)
High level overview

Layout
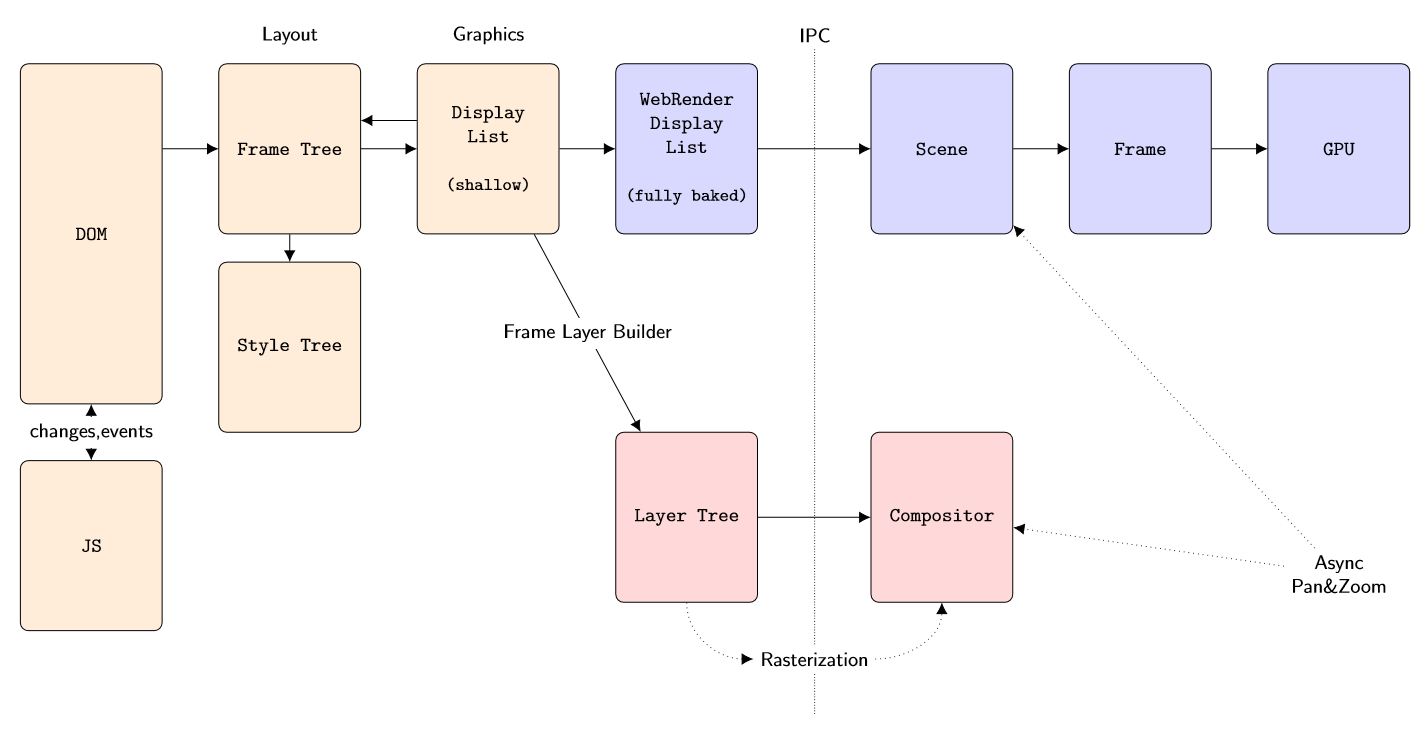
Starting at the left in the above image, we have a document represented by a DOM - a Document Object Model. A Javascript engine will execute JS code, either to make changes to the DOM, or to respond to events generated by the DOM (or do both).
The DOM is a high level description and we don’t know what to draw or where until it is combined with a Cascading Style Sheet (CSS). Combining these two and figuring out what, where and how to draw things is the responsibility of the Layout team. The DOM is converted into a hierarchical Frame Tree, which nests visual elements (boxes). Each element points to some node in a Style Tree that describes what it should look like – color, transparency, etc. The result is that now we know exactly what to render where, what goes on top of what (layering and blending) and at what pixel coordinate. This is the Display List.
The Display List is a light-weight data structure because it’s shallow – it mostly points back to the Frame Tree. There are two problems with this. First, we want to cross process boundaries at this point. Everything up until now happens in a Content Process (of which there are several). Actual GPU rendering happens in a GPU Process (on some platforms). Second, everything up until now was written in C++; but WebRender is written in Rust. Thus the shallow Display List needs to be serialized in a completely self-contained binary blob that will survive Interprocess Communication (IPC) and a language switch (C++ to Rust). The result is the WebRender Display List.
WebRender
The GPU process receives the WebRender Display List blob and de-serializes it into a Scene. This Scene contains more than the strictly visible elements; for example, to anticipate scrolling, we might have several paragraphs of text extending past the visible page.
For a given viewport, the Scene gets culled and stripped down to a Frame. This is also where we start preparing data structures for GPU rendering, for example getting some font glyphs into an atlas for rasterizing text.
The final step takes the Frame and submits commands to the GPU to actually render it. The GPU will execute the commands and composite the final page.
Software
The above is the new WebRender-enabled way to do things. But in the schematic you’ll note a second branch towards the bottom: this is the legacy code path which does not use WebRender (nor Rust). In this case, the Display List is converted into a Layer Tree. The purpose of this Tree is to try and avoid having to re-render absolutely everything when the page needs to be refreshed. For example, when scrolling we should be able to redraw the page by mostly shifting things around. However that requires those ‘things’ to still be around from last time we drew the page. In other words, visual elements that are likely to be static and reusable need to be drawn into their own private “page” (a cache). Then we can recombine (composite) all of these when redrawing the actual page.
Figuring out which elements would be good candidates for this, and striking a balance between good performance versus excessive memory use, is the purpose of the Layer Tree. Each ‘layer’ is a cached image of some element(s). This logic also takes occlusion into account, eg. don’t allocate and render a layer for elements that are known to be completely obscured by something in front of them.
Redrawing the page by combining the Layer Tree with any newly rasterized elements is the job of the Compositor.
Even when a layer cannot be reused in its entirety, it is likely that only a small part of it was invalidated. Thus there is an elaborate system for tracking dirty rectangles, starting an update by copying the area that can be salvaged, and then redrawing only what cannot.
In fact, this idea can be extended to delta-tracking of display lists themselves. Traversing the layout tree and building a display list is also not cheap, so the code tries to partially invalidate and rebuild the display list incrementally when possible. This optimization is used both for non-WebRender and WebRender in fact.
Asynchronous Panning And Zooming
Earlier we mentioned that a Scene might contain more elements than are strictly necessary for rendering what’s visible (the Frame). The reason for that is Asynchronous Panning and Zooming, or APZ for short. The browser will feel much more responsive if scrolling & zooming can short-circuit all of these data transformations and IPC boundaries, and instead directly update an offset of some layer and recomposite. (Think of late-latching in a VR context)
This simple idea introduces a lot of complexity: how much extra do you rasterize, and in which direction? How much memory can we afford? What about Javascript that responds to scroll events and perhaps does something ‘interesting’ with the page in return? What about nested frames or nested scrollbars? What if we scroll so much that we go past the boundaries of the Scene that we know about?
See Asynchronous Panning and Zooming for all that and more.
A Few More Details
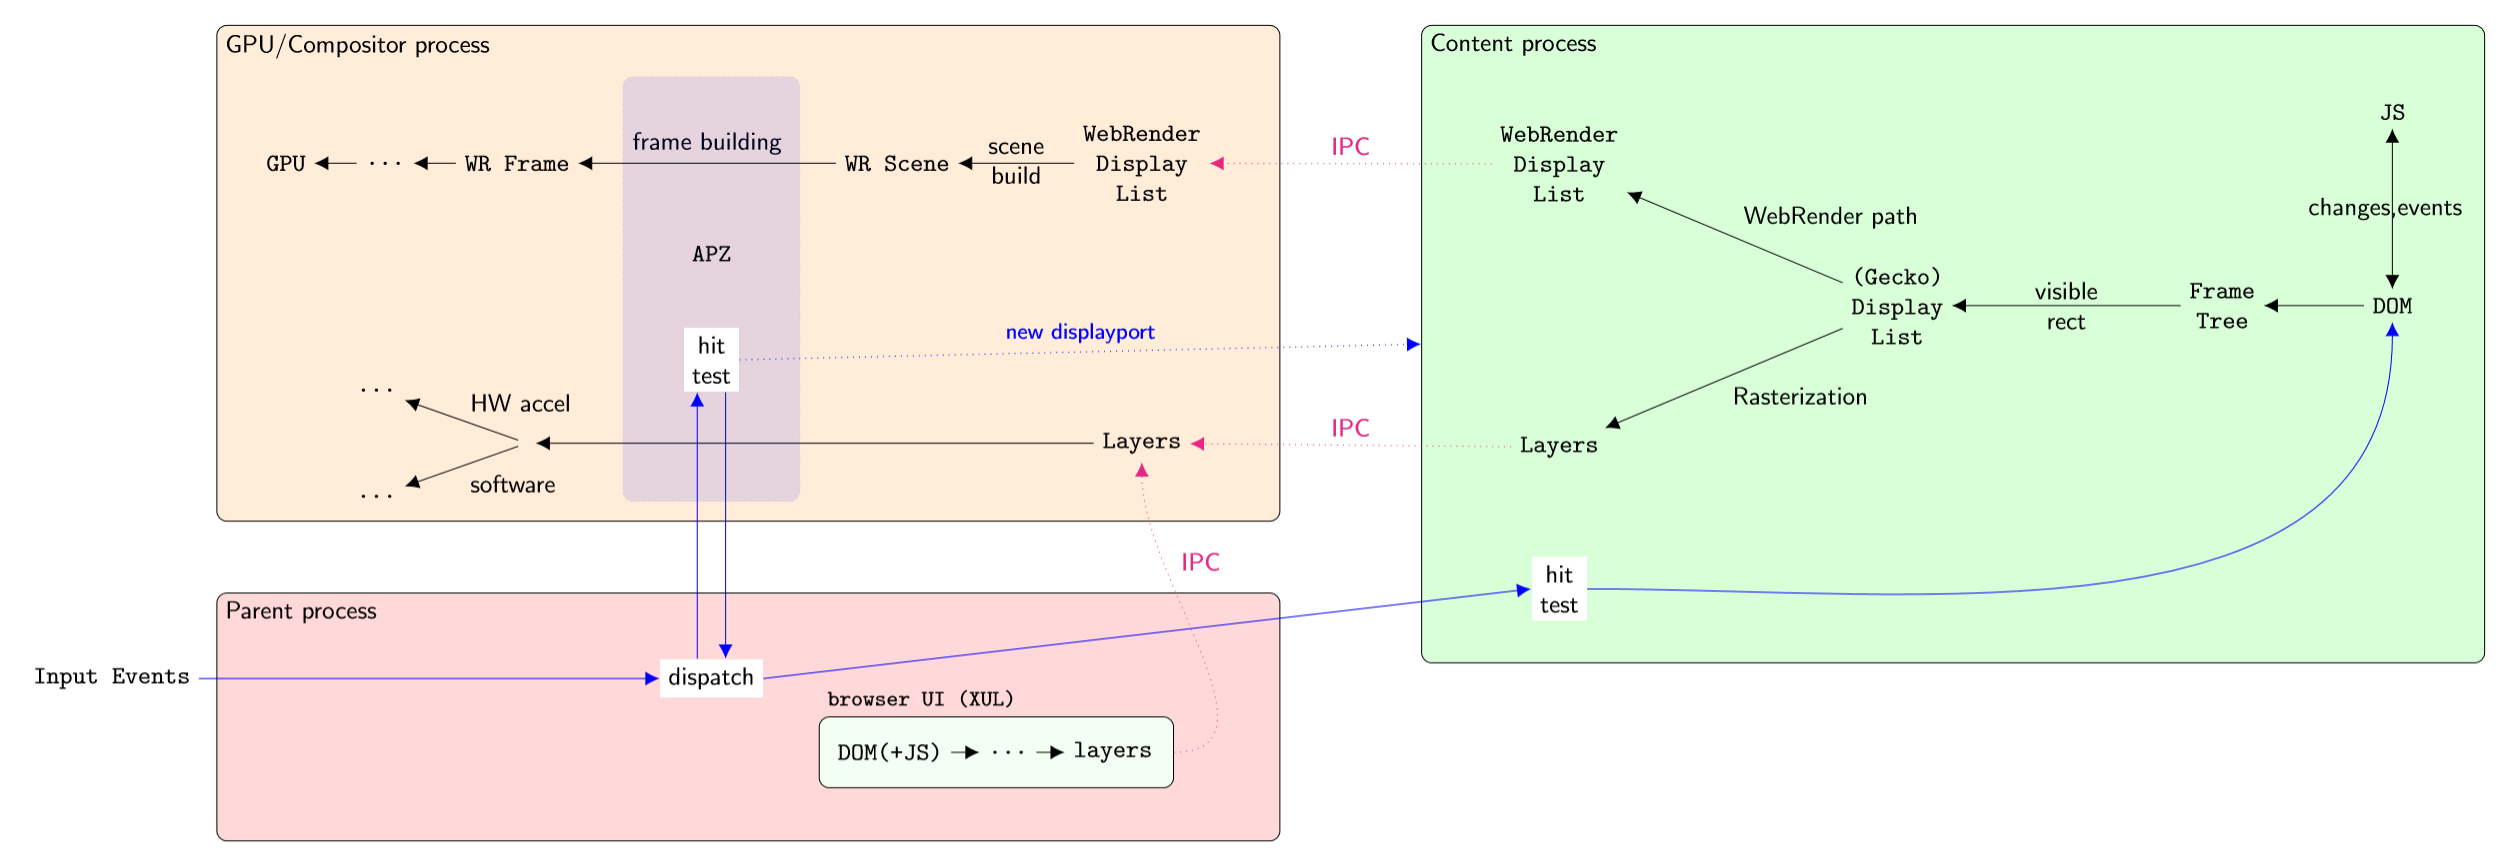
Here’s another schematic which basically repeats the previous one, but showing a little bit more detail. Note that the direction is reversed – the data flow starts at the right. Sorry about that :)

Some things to note:
there are multiple content processes, currently 4 of them. This is for security reasons (sandboxing), stability (isolate crashes) and performance (multi-core machines);
ideally each “webpage” would run in its own process for security; this is being developed under the term ‘fission’;
there is only a single GPU process, if there is one at all; some platforms have it as part of the Parent;
not shown here is the Extension process that isolates WebExtensions;
for non-WebRender, rasterization happens in the Content Process, and we send entire Layers to the GPU/Compositor process (via shared memory, only using actual IPC for its metadata like width & height);
if the GPU process crashes (a bug or a driver issue) we can simply restart it, resend the display list, and the browser itself doesn’t crash;
the browser UI is just another set of DOM+JS, albeit one that runs with elevated privileges. That is, its JS can do things that normal JS cannot. It lives in the Parent Process, which then uses IPC to get it rendered, same as regular Content. (the IPC arrow also goes to WebRender Display List but is omitted to reduce clutter);
UI events get routed to APZ first, to minimize latency. By running inside the GPU process, we may have access to data such as rasterized clipping masks that enables finer grained hit testing;
the GPU process talks back to the content process; in particular, when APZ scrolls out of bounds, it asks Content to enlarge/shift the Scene with a new “display port”;
we still use the GPU when we can for compositing even in the non-WebRender case;
WebRender In Detail
Converting a display list into GPU commands is broken down into a number of steps and intermediate data structures.

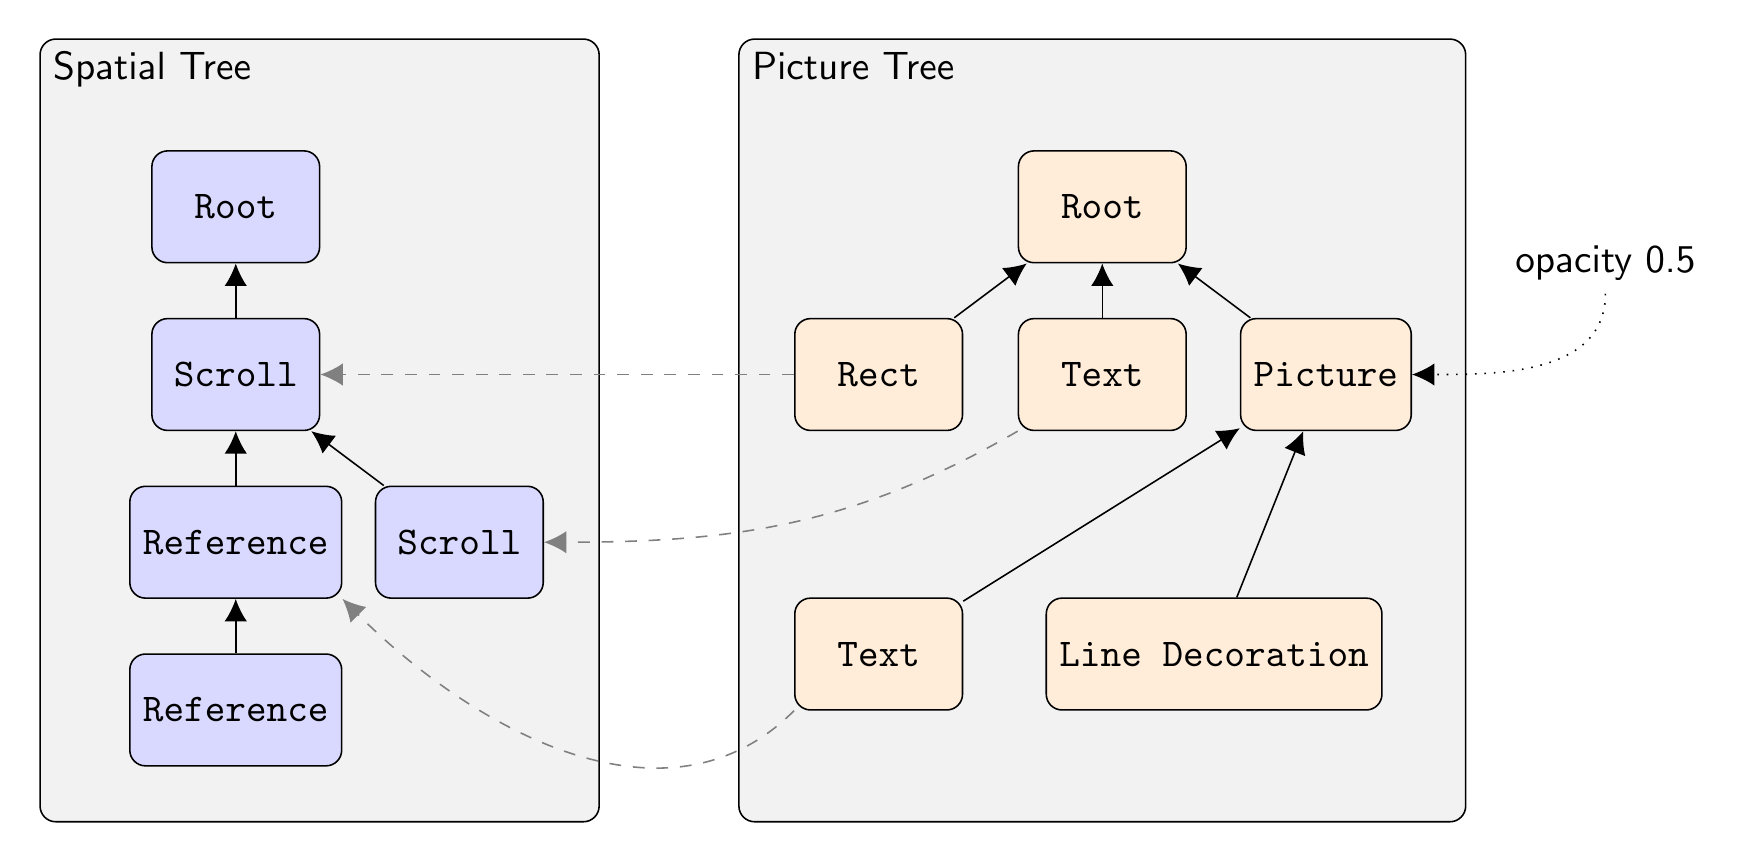
Each element in the picture tree points to exactly one node in the spatial tree. Only a few of these links are shown for clarity (the dashed lines).
The Picture Tree
The incoming display list uses “stacking contexts”. For example, to render some text with a drop shadow, a display list will contain three items:
“enable shadow” with some parameters such as shadow color, blur size, and offset;
the text item;
“pop all shadows” to deactivate shadows;
WebRender will break this down into two distinct elements, or “pictures”. The first represents the shadow, so it contains a copy of the text item, but modified to use the shadow’s color, and to shift the text by the shadow’s offset. The second picture contains the original text to draw on top of the shadow.
The fact that the first picture, the shadow, needs to be blurred, is a “compositing” property of the picture which we’ll deal with later.
Thus, the stack-based display list gets converted into a list of pictures – or more generally, a hierarchy of pictures, since items are nested as per the original HTML.
Example visual elements are a TextRun, a LineDecoration, or an Image (like a .png file).
Compared to 3D rendering, the picture tree is similar to a scenegraph: it’s a parent/child hierarchy of all the drawable elements that make up the “scene”, in this case the webpage. One important difference is that the transformations are stored in a separate tree, the spatial tree.
The Spatial Tree
The nodes in the spatial tree represent coordinate transforms. Every time the DOM hierarchy needs child elements to be transformed relative to their parent, we add a new Spatial Node to the tree. All those child elements will then point to this node as their “local space” reference (aka coordinate frame). In traditional 3D terms, it’s a scenegraph but only containing transform nodes.
The nodes are called frames, as in “coordinate frame”:
a Reference Frame corresponds to a
<div>;a Scrolling Frame corresponds to a scrollable part of the page;
a Sticky Frame corresponds to some fixed position CSS style.
Each element in the picture tree then points to a spatial node inside this tree, so by walking up and down the tree we can find the absolute position of where each element should render (traversing down) and how large each element needs to be (traversing up). Originally the transform information was part of the picture tree, as in a traditional scenegraph, but visual elements and their transforms were split apart for technical reasons.
Some of these nodes are dynamic. A scroll-frame can obviously scroll, but a Reference Frame might also use a property binding to enable a live link with JavaScript, for dynamic updates of (currently) the transform and opacity.
Axis-aligned transformations (scales and translations) are considered “simple”, and are conceptually combined into a single “CoordinateSystem”. When we encounter a non-axis-aligned transform, we start a new CoordinateSystem. We start in CoordinateSystem 0 at the root, and would bump this to CoordinateSystem 1 when we encounter a Reference Frame with a rotation or 3D transform, for example. This would then be the CoordinateSystem index for all its children, until we run into another (nested) non-simple transform, and so on. Roughly speaking, as long as we’re in the same CoordinateSystem, the transform stack is simple enough that we have a reasonable chance of being able to flatten it. That lets us directly rasterize text at its final scale for example, optimizing away some of the intermediate pictures (offscreen textures).
The layout code positions elements relative to their parent. Thus to position
the element on the actual page, we need to walk the Spatial Tree all the way to
the root and apply each transform; the result is a LayoutToWorldTransform.
One final step transforms from World to Device coordinates, which deals with DPI scaling and such.
WebRender term |
Rough analogy |
|---|---|
Spatial Tree |
Scenegraph – transforms only |
Picture Tree |
Scenegraph – drawables only (grouping) |
Spatial Tree Rootnode |
World Space |
Layout space |
Local/Object Space |
Picture |
RenderTarget (sort of; see RenderTask below) |
Layout-To-World transform |
Local-To-World transform |
World-To-Device transform |
World-To-Clipspace transform |
The Clip Tree
Finally, we also have a Clip Tree, which contains Clip Shapes. For example, a rounded corner div will produce a clip shape, and since divs can be nested, you end up with another tree. By pointing at a Clip Shape, visual elements will be clipped against this shape plus all parent shapes above it in the Clip Tree.
As with CoordinateSystems, a chain of simple 2D clip shapes can be collapsed
into something that can be handled in the vertex shader, at very little extra
cost. More complex clips must be rasterized into a mask first, which we then
sample from to discard in the pixel shader as needed.
In summary, at the end of scene building the display list turned into a picture tree, plus a spatial tree that tells us what goes where relative to what, plus a clip tree.
RenderTask Tree
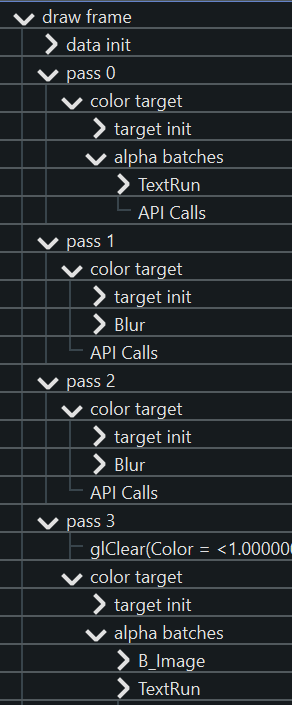
Now in a perfect world we could simply traverse the picture tree and start drawing things: one drawcall per picture to render its contents, plus one drawcall to draw the picture into its parent. However, recall that the first picture in our example is a “text shadow” that needs to be blurred. We can’t just rasterize blurry text directly, so we need a number of steps or “render passes” to get the intended effect:

rasterize the text into an offscreen rendertarget;
apply one or more downscaling passes until the blur radius is reasonable;
apply a horizontal Gaussian blur;
apply a vertical Gaussian blur;
use the result as an input for whatever comes next, or blit it to its final position on the page (or more generally, on the containing parent surface/picture).
In the general case, which passes we need and how many of them depends on how the picture is supposed to be composited (CSS filters, SVG filters, effects) and its parameters (very large vs. small blur radius, say).
Thus, we walk the picture tree and build a render task tree: each high level abstraction like “blur me” gets broken down into the necessary render passes to get the effect. The result is again a tree because a render pass can have multiple input dependencies (eg. blending).
(Cfr. games, this has echoes of the Frostbite Framegraph in that it dynamically builds up a renderpass DAG and dynamically allocates storage for the outputs).
If there are complicated clip shapes that need to be rasterized first, so their output can be sampled as a texture for clip/discard operations, that would also end up in this tree as a dependency… (I think?).
Once we have the entire tree of dependencies, we analyze it to see which tasks can be combined into a single pass for efficiency. We ping-pong rendertargets when we can, but sometimes the dependencies cut across more than one level of the rendertask tree, and some copying is necessary.
Once we’ve figured out the passes and allocated storage for anything we wish to persist in the texture cache, we finally start rendering.
When rasterizing the elements into the Picture’s offscreen texture, we’d
position them by walking the transform hierarchy as far up as the picture’s
transform node, resulting in a Layout To Picture transform. The picture
would then go onto the page using a Picture To World coordinate transform.
Caching
Just as with layers in the software rasterizer, it is not always necessary to redraw absolutely everything when parts of a document change. The webrender equivalent of layers is Slices – a grouping of pictures that are expected to render and update together. Slices are automatically created based on heuristics and layout hints/flags.
Implementation wise, slices reuse a lot of the existing machinery for Pictures; in fact they’re implemented as a “Virtual picture” of sorts. The similarities make sense: both need to allocate offscreen textures in a cache, both will position and render all their children into it, and both then draw themselves into their parent as part of the parent’s draw.
If a slice isn’t expected to change much, we give it a TileCacheInstance. It is itself made up of Tiles, where each tile will track what’s in it, what’s changing, and if it needs to be invalidated and redrawn or not as a result. Thus the “damage” from changes can be localized to single tiles, while we salvage the rest of the cache. If tiles keep seeing a lot of invalidations, they will recursively divide themselves in a quad-tree like structure to try and localize the invalidations. (And conversely, they’ll recombine children if nothing is invalidating them “for a while”).
Interning
To spot invalidated tiles, we need a fast way to compare its contents from the
previous frame with the current frame. To speed this up, we use interning;
similar to string-interning, this means that each TextRun, Decoration,
Image and so on is registered in a repository (a DataStore) and
consequently referred to by its unique ID. Cache contents can then be encoded as a
list of IDs (one such list per internable element type). Diffing is then just a
fast list comparison.
Callbacks
GPU text rendering assumes that the individual font-glyphs are already available in a texture atlas. Likewise SVG is not being rendered on the GPU. Both inputs are prepared during scene building; glyph rasterization via a thread pool from within Rust itself, and SVG via opaque callbacks (back to C++) that produce blobs.